Last updated: February 11, 2025
Google Maps is a world-renowned application used daily by billions of people for navigation, street views, and finding stores, restaurants, and addresses. Additionally, many also use it for work-related tasks.
Because Google Maps can track your daily trips, one might think its Google Maps Timeline extension, could serve as a mileage log for taxes. In fact, many people search for a ‘Google mileage tracker‘ app or a ‘Google Maps mileage tracker.’ Therefore, we dedicated a full article to the subject. 
Try it for free for 14 days. No credit card required!
Dashboard
Google Maps Timeline Mileage Tracking: Myth or Reality?
When considering using Google Maps for mileage tracking, especially for business purposes, it’s important to note that as of September 2024, there is no such thing as a Google Maps mileage tracker. However, it can still be a valuable tool.
Mileage tracker apps like MileageWise can integrate with Google Maps, allowing businesses to cross-reference trip distances for accuracy. Luckily, both Android and iOS users can utilize Google Maps Timeline for mileage tracking, providing route and location estimates based on location history.
While relying on Google Maps as a free mileage tracker sounds great, it is only half the solution, since collecting the data into tax documents falls entirely on you. However, it is possible to create an IRS-proof mileage log automatically from trips recorded by Google Maps.
Do you want to know how you can create a fully IRS-compliant mileage log out of your travels recorded on Google Maps? In this article, we’ll guide you through exporting Google Timeline and turning those records into a proper mileage log.
What is Google Maps Timeline History?
Google Timeline history is a record of locations and routes you’ve traveled if location services are enabled. This feature provides a detailed historical view, allowing users to see their past movements on any given day, as long as their phone was with them and location services were turned on.
How Does Google Maps Timeline History Work?
The Timeline relies on your device’s location services to track your movements over time. When you visit places or travel routes, Google Maps Timeline collects this data and presents it in a chronological map. You can review this timeline by day, month, or year, seeing the specific places you have visited and the routes you took.
Note, that Google Maps Timeline updates automatically and continuously as long as your device’s location services are enabled and you have permitted Google to access your location. Moreover, Google Maps Timeline can update every few minutes or whenever there is a significant location change, ensuring that the location data is up-to-date.
It also records your miles, so it can technically be referred to as a Google Maps mileage tracker.
How Accurate is Google Maps Timeline?
The Timeline‘s accuracy and reliability depend on factors like device settings, such as battery-saving modes or enabling Web & App Activity. However, users can edit or delete their Location History. If inaccuracies are detected, or if you simply wish to remove certain locations, you can manually edit your Timeline to correct or delete specific entries.
Overall, Google Maps Timeline is a powerful tool as a mileage tracker and for reviewing past movements.
Manual action required to save your Google Maps Timeline
To enhance privacy, Google is gradually changing how Location History & Maps Timeline are stored. Namely, it will store your location history directly on your phone instead of Google Cloud. If your Google Timeline is missing here is why.
Additionally, Google will now automatically delete your trips after 3 months instead of the previous 18 months by default. Meaning, you’ll have to decide how long you’ll want to keep your trips.
If you’re driving for business purposes, those travels on Google are extremely valuable for mileage tax deductions. Therefore, I strongly suggest turning off Auto-delete in the Google Maps app because the IRS might review your mileage log for up to 3 years. Read on to learn exactly what to set on your phone for your Google Timeline recovery.
NOTICE
NEW GOOGLE MAPS TIMELINE INTEGRATION - IMPORT FROM MOBILES
Google has changed the storage of the Timeline Location History. It migrated from the cloud to mobile devices. Thus, most users are left without access to their Timelines on desktop platforms. MileageWise steps in with an exclusive solution!
Export your Timeline from your phone. MileageWise will transform it into Precise, IRS-Proof mileage logs!
How to Enable or Disable Location History
When you enable Location History, Google tracks your locations even when the Google Maps app is closed. From mid-2024, your Google Maps Timeline will be stored on your device instead of your Google account.
As enabling and setting up your phone are somewhat different processes on Android and iOS devices, we’ll guide you through both.
Location History on Android Phones
To enable your Location History in Google services, follow these steps:
- Open the Google Maps app on your Android device
- Tap your profile image or account circle, then select Your Timeline
- Tap More, followed by Settings and Privacy
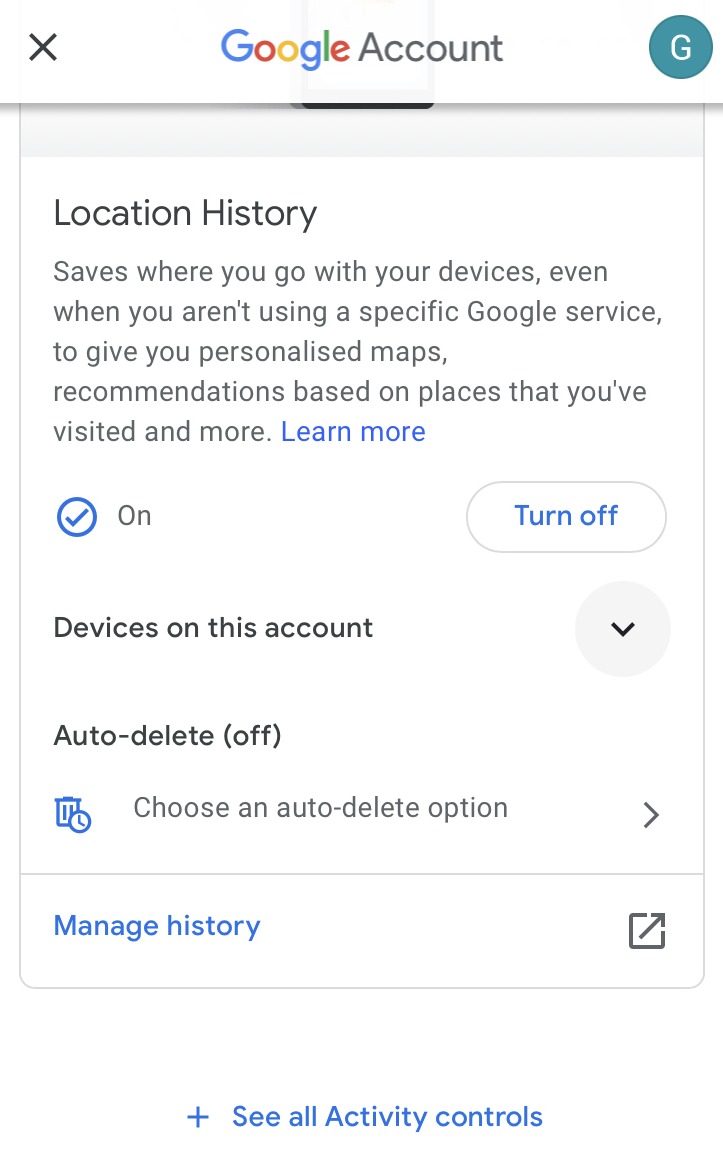
- Turn Location History ON
- Turn Auto-delete OFF
FYI:
- You can also disable Location History in this menu.
- You may edit your Timeline and erase your Location History.
- Your Timeline for Google is private and only accessible to you.
- Ensure your settings are correct. Double-check the optimal settings to make sure that everything’s set up correctly.
Now, let’s see what iOS users have to set to enable their Timeline:
Location History on iOS
For iPhones or iPads, follow these steps. Since Google Maps is not a default app on iOS, you need to install it first.
- Download and install Google Maps from the App Store if it’s not already installed.
- Open Google Maps, sign in with your Google account, tap your profile picture or initial, select ‘Your Timeline,’ and enable ‘Location History’.
Once Location History is enabled, your movements will be recorded in the Google Maps Timeline.
How to see your location history on Google Maps
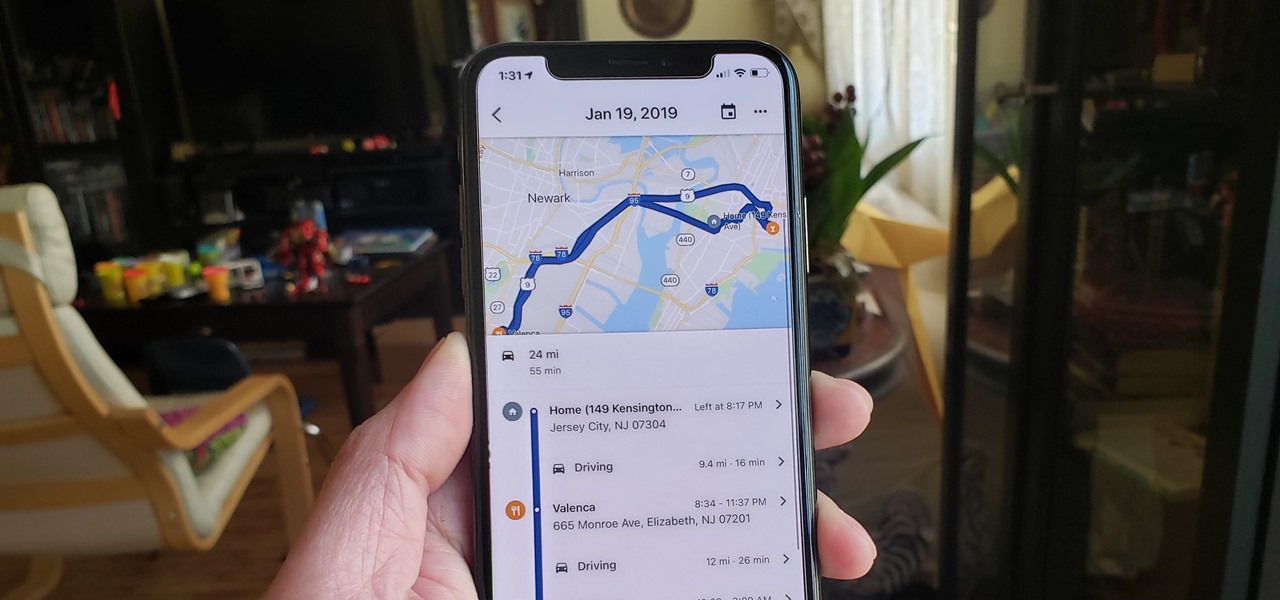
When you enable Location History, Google Timeline displays your travel details, including walking, bicycling, driving, or public transportation. For a vehicle mileage log, you’ll only need trips that were taken by car, but MileageWise’s solution solves this issue, too 🙂
Let’s see the steps:
- Open the Google Maps app on your device.
- Tap your profile image or the first account circle, then select Your Timeline.
- Tap Today at the top to find another day or month. Then, swipe the calendar left or right and press a day.
Tracking Mileage with Google Maps Timeline
Once you have enabled Google Maps Timeline Location History, it tracks your trips while running completely in the background, if you have your mobile data turned on.
Moreover, Google Maps also records the date, time, location, and number of miles taken for each trip. Therefore, this data is crucial for your IRS-proof mileage log, which we’ll discuss later in this article.
Export your Google Maps Timeline
The next step is to export these trips from the software via Google Takeout, Google’s data export service. We’ve written a detailed step-by-step article about the entire trip export via Google Takeout. Follow the directions to get the data you need to convert your Google Maps Timeline into a mileage log for your next mileage tax deduction.
Open Google Takeout To Export Trips
New Mobile Timeline Import Available
The first and only solution on the market, exclusive to MileageWise! Export your Timeline from your phone, and we’ll convert it into precise, IRS-proof mileage logs!
Import Google Maps Timeline to MileageWise
Once you’re done exporting, it only takes a drag-and-drop to add your Google Takeout ZIP file or JSON file with your Google Maps trips in MileageWise’s Web Dashboard platform, opened in a browser from your desktop. After the process is done, you will have an accurate log of your trips for the chosen vehicle and month.
This step needs to be done as neither the trip list in Google Timeline nor the exported saved places from Google Maps are sufficient by themselves in the eyes of the IRS for a vehicle mileage tax deduction claim.
We’ve also created a help article that shows you step-by-step how to import your downloaded ZIP or JSON file into MileageWise’s mileage calculator software in order to get a 100% IRS-approved mileage log.
Check out our tutorial video on how to create an IRS-proof mileage log from a Google Timeline file in a matter of minutes:
As already mentioned above, Google has made updates to the Location History feature that could disable your yearly Retrospective Trip Recovery from Google Timeline!
Steps you should take to save your Google Timeline data:
- Turn auto delete OFF: Google will change the automatic deletion of the Timeline from 18 months to 3 months by default
- Turn location history ON: Location History is turned off by default
- Back up your Timeline in the Cloud: Instead of the Google Cloud, the Timeline will be stored on your device by default
Google will introduce these changes gradually on iOS and Android devices and will notify you when your account receives the update.
Is your Google Maps Timeline History missing?
No worries! If your Google Timeline is missing and you lost data, reconstruct your trips with MileageWise’s very own AI Recommendation Wizard!
With our AI Wizard feature, you can recreate your past miles and fill in the gaps with ease while ensuring IRS compliance. Embrace the simplicity and accuracy of our solution and maximize your tax savings.
Benefits of using Google Maps Timeline as a mileage tracker
While the method mentioned above is great for fixing your mileage log retrospectively, it’s highly recommended that you start using a bulletproof mileage tracker app like MileageWise as soon as possible for your day-to-day mileage logging.
Besides that, enabling Location History in your Google account makes a powerful mileage log backup by Google just in case.
On top of these, having a mileage app or software means that you don’t need to worry about having a Google Maps mileage tracker as MileageWise does it all for you.
Frequently Asked Questions about Google Maps Timeline
How do I access my Google Maps timeline data?" / "How to check my Location History?
- Open Google Maps
- Tap your profile picture or Your Timeline
- Select a place from Timeline
- Tap Details
- Scroll until you find Timeline. Next to this icon, you can find information about the last time you visited.
What can I see on my Google Maps Timeline history? Can I see where I have been on Google Maps?
In your Google Timeline history, you can see the places you’ve visited with dates included, as well as the routes you may have taken between those locations.
Does Google track my location?
Yes, Google can track your location if you have location services enabled on your device. This feature is used to provide personalized services, such as traffic updates, nearby places, and more accurate search results. You can manage and review your location history through your Google Account settings and can turn off location tracking if you choose.
How can Google get my location information?
Google can use real-time signals, such as your IP addresses or your devices. Turn on location access on your device and log in to your Google account. Google will have access to your locations to store them in your Timeline.
How do I track a phone in Google Maps?
To track a phone using Google Maps, ensure the device shares its location with you through Google’s ‘Location sharing’ feature.
How can I save a location or address in Google Maps?
To save a location in Google Maps, search for the location or pin it on the map, then click or tap on the location’s name or address at the bottom of the screen and choose “Save” or “Add to favorites”.
How accurate is the data shown on my Google Maps Timeline history?
Because of its access to our mobile, Google’s chronology is incredibly precise. We know the precise location where we are traveling since it has always happened on our cell phone through GPS and added to the interaction we have with the many WiFi antennas and telephone antennas around us.
How do I download my routes and trips?
To download a Google Maps route, use the ‘Share’ or ‘Export’ options available in the directions feature.
How do I track the distances of my trips in Google Maps?
To track distance on Google Maps, start by entering your start and destination points into the Directions feature. Google Maps will calculate the distance and provide route options. For continuous distance tracking or more complex route planning, consider using the Measure Distance tool available in the right-click menu on the desktop version of Google Maps.
Can my Timeline history be changed/updated manually if needed?
If a place or a route is wrong on Timeline, you can edit the location and when you were there. On your computer, go to Timeline. Choose the correct place or search for a place in the search box. To edit when you were there, click the time.
How do I sign out of Google Maps?
To sign out of Google Maps on a device, go to the menu, select your account avatar or initials, and click on “Sign out” or “Switch account”.
Should I turn off Google location history? How do I turn off location history?
Do not turn off your location history if you would like to rely on it for mileage logging and if you want to be able to review your visited locations in general.
To turn off location history on a device using Google services, go to your Google Account settings, navigate to the “Data & personalization” tab, and find the “Location History” section. Here, you can switch off the feature for your entire account or manage settings for individual devices. This will stop Google from saving your location markers to your location history.
What are some of the uses for Google Timeline that people have come up with so far?
Besides being used as a mileage logging method and a mileage log backup, you may utilize Google Maps Timeline as:
- a travel diary,
- a reminder of what places you’ve visited,
- quick access to your recent locations & trips
- your Google Maps search history,
- a source of email updates highlighting recently visited places
Can Google Maps track mileage?
Yes, Google Maps can track your trips using the Timeline feature, which records locations and routes based on your location history. However, Google Maps does not have a built-in mileage tracker specifically designed for logging mileage for business purposes or tax deductions. For precise mileage tracking, you would typically need to use specialized apps that can integrate with Google Maps to ensure accuracy and compliance with tax regulations.
Can I use Mileage Tracker Google Sheets?
While some Youtube videos deal with the subject, please note that they usually encourage you to build simple mileage trackers in Google Sheets that will require your manual input after each trip, or each day. If you have access to your Google Maps data, we highly recommend that you don’t waste your time trying to stay on top of your mileage log by manually updating it daily, but take advantage of the easier and more accurate option.
Can I use my fleet's Google Timeline records to create company mileage logs retrospectively?
Sure, just follow the steps described above and you’ll be able to take advantage of the records Google automatically recorded in your employees’ vehicles. But make sure that you use MileageWise to turn those records into proper mileage logs.
If you get stuck, you can always contact us and avail of MileageWise’s tax preparation service called Mileage Log Tax Preparation Service which guarantees that our experts review and recover past trips accurately and create an IRS-Proof log out of them.
How many retrospective years am I allowed to recover from my Google Timeline records?
You actually have 3 years to file a tax return and claim mileage reimbursement so if you haven’t done so yet, you should definitely dig into your Google Timeline records!
As you can see, mileage logging with Google Maps is pretty easy, and with MileageWise it can also be converted into a 100% IRS-approved mileage log.
Enable your Location History as a mileage log backup, but be sure to get your day-to-day mileage logging game straight with an automatic mileage tracker app like MileageWise – available on both Google Play Store and Apple’s App Store.


